Building a blog using HTML
Hello everyone! Today I am going to be teaching you how to build a blog using just HTML. HTML stands for Hypertext Markup Language and is used for laying out elements on a webpage. Today, we will make this webpage:
Setting Up your work enviornment
Its time to set up where we will be coding. There are many IDE's (integrated development enviornments) you can use. For this example I will be using replit, a free online ide (see replit.com).
IDE = Integrated Development Environment. It is a "software for building applications that combines common developer
tools into a single graphical user interface (GUI)"
~Definition taken from Red Hat at
redhat.com
If you are going to use replit to create your Blog, keep in mind all of it will be public, so anyone can view your code. (As a result, I suggest not using your real name while creating your account.) If you would like to create a private project, try using a desktop IDE, such as Visual Studio Code. or Atom. You can find installation and project setup information HERE for Atom and HERE for Visual Studio Code.
On with the show.
To set up your new project in replit, go to your replit homepage and click " + new repl". Then in the popup, select HTML,CSS Javascript from the languages list and give your project a name. At last, click 'Create repl'.
Your IDE is now all ready. Time to start with the HTML!
Dissecting the Starter Code
Lets take a look at the replit workspace. We have our files on the left, our code area in the middle, and our website preview on the right. Beneath the website preview is the console (the dark box). You are welcome to minimize it, as we will not be using the console in today's lesson.
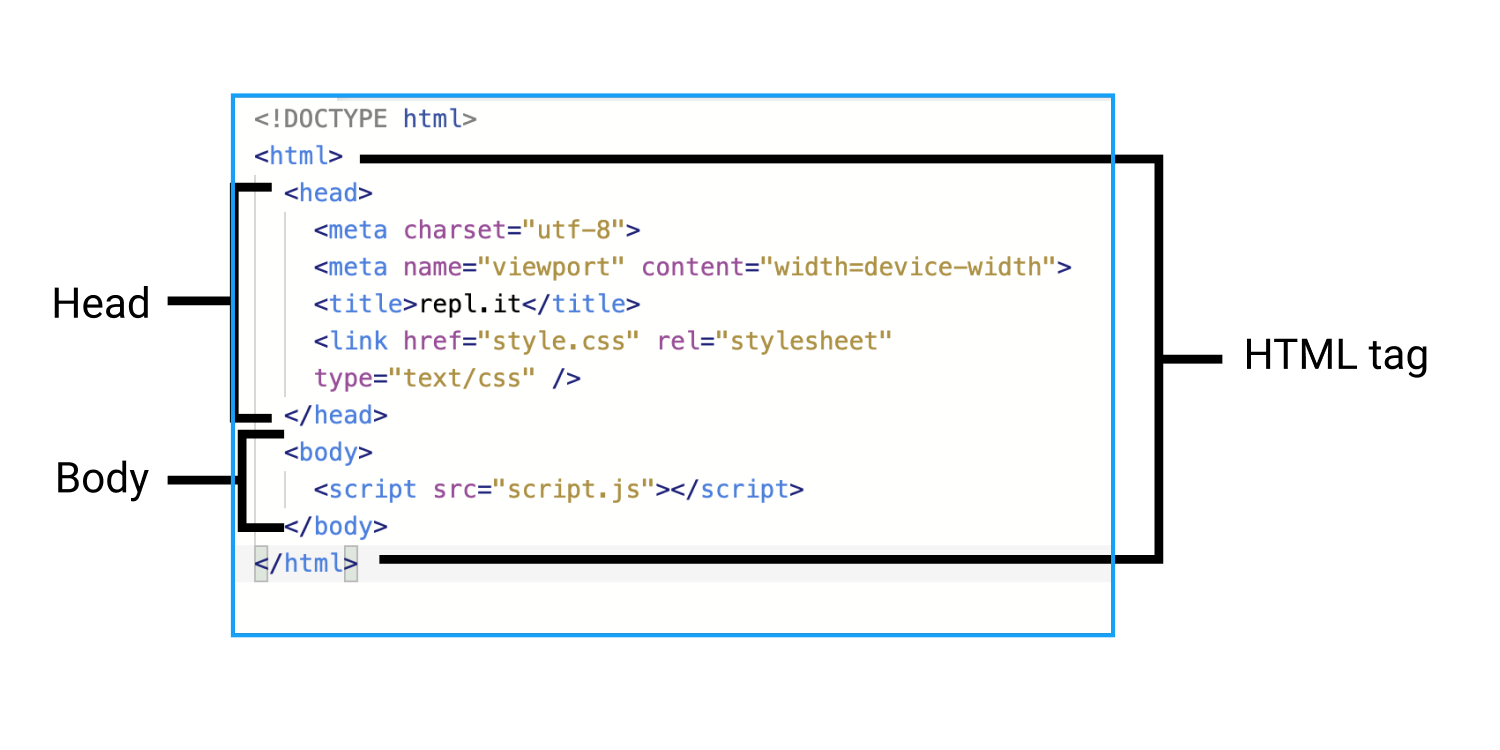
You should be on the file titled index.html. In this file, we see that replit has provided us with some starter code. on the first line of our starter code we see <!DOCTYPE html> . This simply warns/tells the browser that we are working in HTML and that this is an HTML document. Going to the next line, we see: <html>. This is called the html tag. In between <html> and </html> (which you will find at the end of the document) tags is where all the HTML will be (except for the <!DOCTYPE html> ).
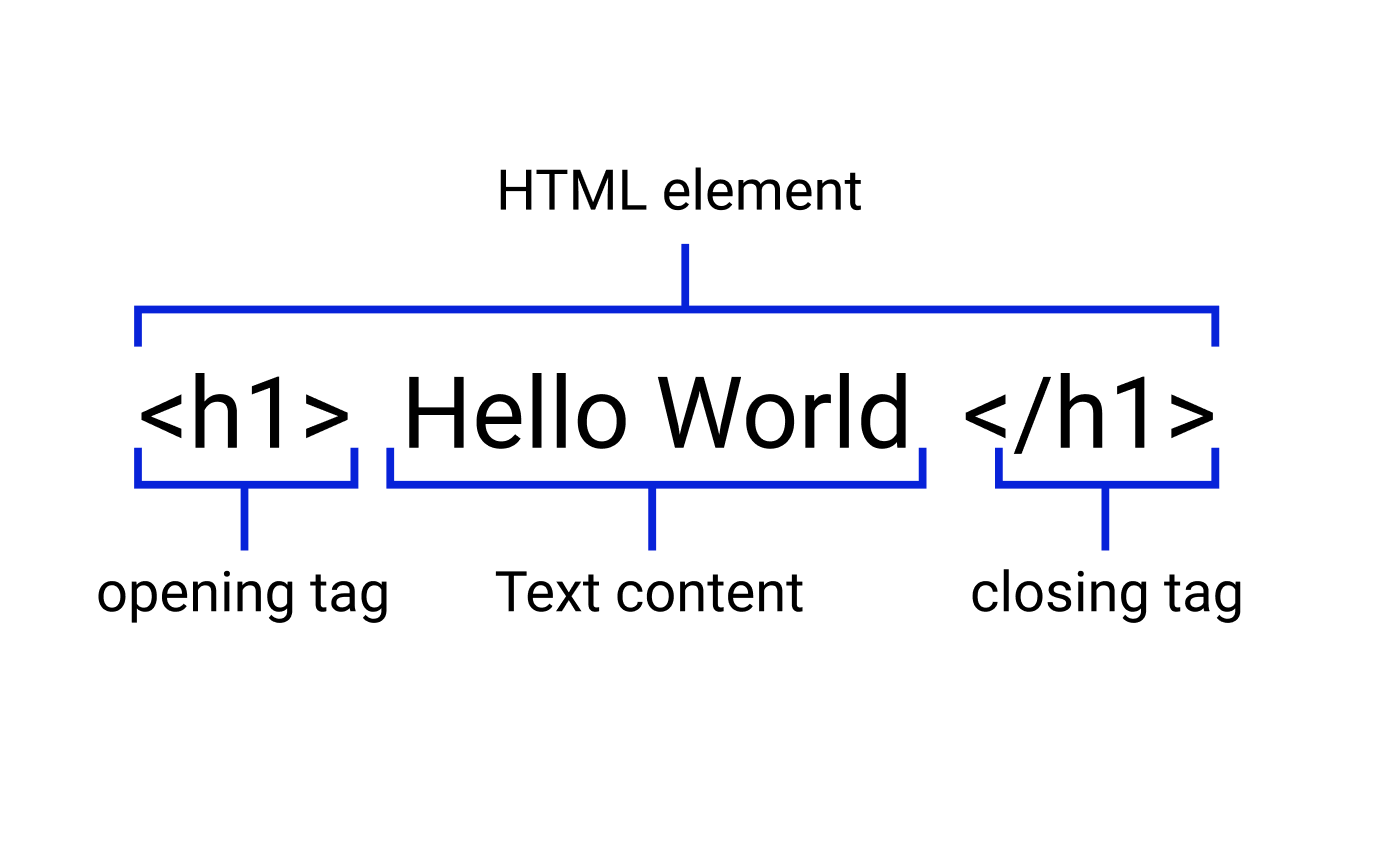
An HTML tag. HTML consists of tags. These tags go on the either side of your text content (the text your want on your webpage) and help style that text.
The line after that contains the head tag. (<head>). Basically, the content enclosed in the html tag is divided into 2 sections, the head and the body.
You may have noticed that the HTML tags I'm talking about have this format: <TagName> and </TagName>. The only difference between the two tags is that the one with the backslach is a closing tag and the one without the backslash is a closing tag. Together, the opening tag, what is between the opening and closing tag, and the closing tag make up an html element. There will be more on HTML tags later.
Inside the head tag we see the HTML, <meta charset="utf-8"> This basically tells the browser (where your html code will be running) to use the UTF-8 charecter encoding. UTF-8 charecter encoding is used to take the 'machine-text' and turn it into something people can read. You can learn more about UTF-8 HERE.
The next line of code in the head tag is the <meta name="viewport" content="width=device-width">. This gives the browser that your html will be running on direction for how to scale your website.
The next line of code in the head is the title tag. The text inbetween the opening and closing tag title tag ( <title> and </title>) determines what the tab your page is on says. You can change the text inbetween the opening and closing tag to have the title of your tab be different.
The next line of the code is <link href="style.css" rel="stylesheet" type="text/css" /> Feel free to delete this line of code. This line of code connects HTML to CSS, but since we will not be dealing with CSS in this lesson the link to the CSS file is irrelevant.
The next line consists of the opening body tag (<body>). This just means that the code after the opening body tag and before the closing body tag is in the body of the HTML document.
The head and body tags of the HTML are primarily used for organizing the document into two clear sections (the head and the body). The head contains the imports to other documents, the meta tags, etc, The body contains the content that will show up on the webpage.
In the body tag is the line <script src="script.js"></script>. This line is used for connecting our HTML website to a javascript file. Since we will not be doing this in this lesson, you can go ahead and delete this line.
Creating our heading for the Blog
So now its time to add text to our website! Yes! Lets start by adding a title. You can make your title whatever you want it to be. I'm just going to call it 'My Blog'. Remeber that the text content that goes on the website should be inside the body element.
<body>
PUT YOUR TITLE HERE
</body>
Brilliant! Lets run our HTML and see what happens!
I notice two things:
- Stuff got on our website! Yes!
- Wow does our header look small and wimpy.
Our header doesn't really seem like a header. It looks small. To fix this, we can add an h1 element. What the h1 tag does is it formats your text to look larger and more heading-like. In fact, h1 stands for heading one. Lets see what our website looks like with the 'My Blog' text wrapped in a h1 tag.
Much better! Our heading is much larger and more heading-like.
There are actually 6 tags to create headings. h1 creates the largest one, they are h1, h2, h3, h4, h5 and h6. Try playing around with them HERE. Please note that you will likely have to fork the repository (a fancy way of saying, please copy all my files and code into a different folder). To do this click on the fork button. (It should say FORK on it and have a little fork emoji that looks like a 2-pronged fork.)
Here we can see the opening and closing tag structure more clearly. It looks like this (remember the syntax is
<TagName> and </TagName>):
Please note that not all HTML elements have a closing tag, as they are self closing. We will see examples of this later on.
Adding a paragraph
Now its time to add a paragraph (or if you are like me, a sentence). For this we will use the paragraph tag, also called the p tag. The syntax looks like this: <p> **insert whatever I want in here** <p>. Try adding it to your blog on your own.
How did that go for you? (Remeber to click the 'run' button if you are on replit). Your code and website should look something like this:

If you need to see the HTML up close, here it is (this only includes the HTML in the body tag, including the body tag).
<body>
<h1>My Blog</h1>
<p>Hello! Welcome to my blog. Its a blog. Here I will tell you about stuff. It will be interesting. It will be so interesting you will stop reading at this point. </p>
</body>
As you can see, writing blogs is not my forte.
Add an image!
To add an image, use the image tag. This is a self closing tag. The syntax is: <img src = "image url">. Looking at the image tag syntax, we can see that it is a self-closing tag. We also see that to add an image to a site, we need the image url. As an example, lets say our image url is https://cdn.pixabay.com/photo/2012/04/13/21/31/fish-33712_1280.png., so our image tag becomes:
<img src = "https://cdn.pixabay.com/photo/2012/04/13/21/31/fish-33712_1280.png" >
Try adding an image to your blog after your paragraph. Depending on the size of your image, you will notice one of three things.
- Wow our image is huge.
- Wow our image is small
- Wow our image is just right.
If you notice the third one, then you are very lucky. The thing is, images do not usually come out in the size we want them to. As a result, we have to add width and height attributes.
Lets start off with an example of the width attribute in action:
<img width = "300px" src = "https://cdn.pixabay.com/photo/2012/04/13/21/31/fish-33712_1280.png" >
Here we are basically setting the image width to 300px. The image will also decrease or increase in height to maintain its aspect ratio (the aspect ratio is the proprotion between the height of the image and the width of the image. Its what prevents images from looking like funhouse mirrors).You will notice that I did not just write "300", I added a "px". px stands for pixels.
A pixel is a single box of color. Pixels make up images. To learn more about pixels, go HERE
As a challenge delete the widht attribute and try to set the height to 300px using the height attribute.
Here is the solution:
<img src = "https://www.bbc.co.uk/bitesize/topics/zf2f9j6/articles/z2tgr82" height = "300px" >
Not that 'src' is also an attribute, and the HTML will also work of you if you change the order of the attributes, in other words, if you do this:
<img height = "300px" src = "https://www.bbc.co.uk/bitesize/topics/zf2f9j6/articles/z2tgr82" >
"HTML attributes provide additional information about HTML elements." (definition taken from w3schools.com). They are found between the tagName and the closing '>' of the opening tag of the element. ( < tagName "INSERT ATTRIBUTES HERE!" >)
As a challenge, try to finish off your blog by adding more paragraphs and images. Try messing with the heading tags to create subheadings. Maybe change the topic of the blog altogether!